Creating DDL and Copying Data: Migrating SQL Server to Snowflake Made Easy


Recently, I worked on a project to migrate multiple on-premise SQL Server databases to Snowflake using Azure Data Factory. The project involved migrating close to 30 databases, each containing an average of 100 tables. One of the challenges I encountered was creating the Data Definition Language (DDL) scripts in Snowflake for all these tables before initiating the data transfer.
Unfortunately, Azure Data Factory does not have an auto-create table option for Snowflake, which means that I had to manually create the object DDLs in Snowflake for all the tables before starting the data transfer. Creating these DDL scripts involved translating T-SQL from SQL Server to ANSI SQL used by Snowflake, a process that can be quite time-consuming if done manually.
In this blog post, I will share my approach to generating DDL scripts in Snowflake from SQL Server using Azure Data Factory. I will cover two options: using the INFER_SCHEMA Snowflake function and creating a custom SQL script to create DDL. Additionally, I will discuss how to leverage the Script Activity in Azure Data Factory to automate the process.
Note: I have configured the necessary linked services between Azure Data Factory and Snowflake, Azure Blob Storage, and On-Premises SQL Server.
1) Using INFER_SCHEMA in Script Activity
The INFER_SCHEMA function in Snowflake simplifies the process of creating table structures by automatically inferring the schema from data files, such as Parquet or CSV. This function analyzes the data’s structure and generates the necessary DDL statements, making it a convenient option for quickly creating tables without manual intervention. However, it typically generates column names in lowercase, which may require additional adjustments to match specific naming conventions.
ADF Pipeline
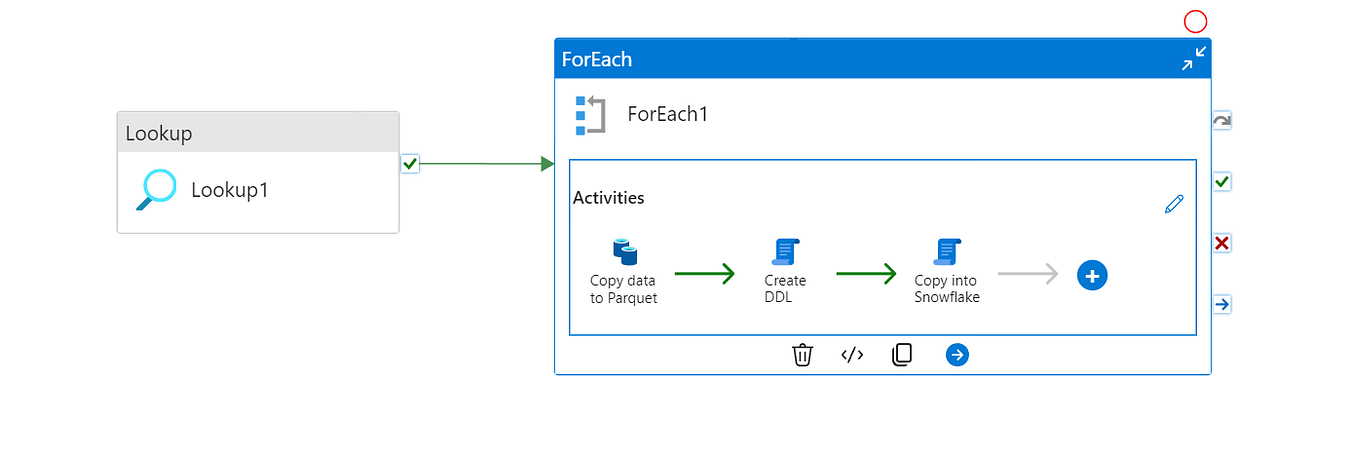
Lookup Activity
First, to retrieve a list of schemas and tables from on-prem SQL server by running the below SQL query in the Lookup activity, just for this example, I am retrieving only 5 tables. Configured Linked service to On-prem SQL server.
SELECT TOP 5
    TABLE_SCHEMA,
    TABLE_NAME
FROM
    INFORMATION_SCHEMA.TABLES
WHERE
    TABLE_TYPE = 'BASE TABLE'
ORDER BY
    TABLE_SCHEMA,
    TABLE_NAME;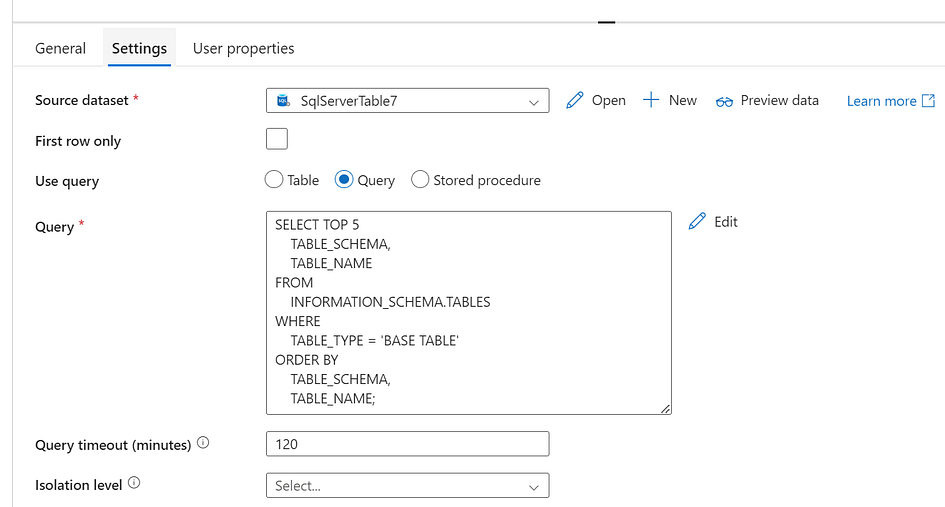
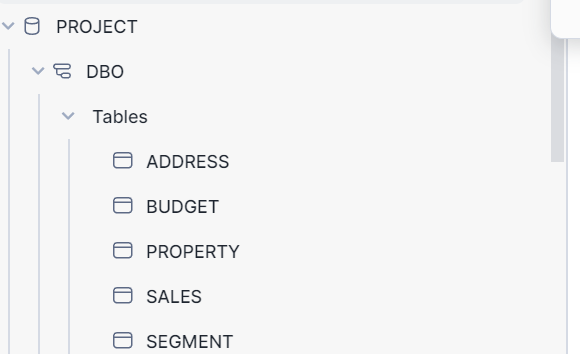
The Lookup activity returned a list of 5 tables from the on-prem SQL server, with their corresponding schema and table names, as follows
{
 "count": 5,
 "value": [
  {
   "TABLE_SCHEMA": "dbo",
   "TABLE_NAME": "Address"
  },
  {
   "TABLE_SCHEMA": "dbo",
   "TABLE_NAME": "Budget"
  },
  {
   "TABLE_SCHEMA": "dbo",
   "TABLE_NAME": "Property"
  },
  {
   "TABLE_SCHEMA": "dbo",
   "TABLE_NAME": "Sales"
  },
  {
   "TABLE_SCHEMA": "dbo",
   "TABLE_NAME": "Segment"
  }
 ],
 "effectiveIntegrationRuntime": "tfy-kut-01(tfy-kut-01)",
 "billingReference": {
  "activityType": "PipelineActivity",
  "billableDuration": [
   {
    "meterType": "SelfhostedIR",
    "duration": 0.016666666666666666,
    "unit": "Hours"
   }
  ],
  "totalBillableDuration": [
   {
    "meterType": "AzureIR",
    "duration": 0.06666666666666667,
    "unit": "Hours"
   }
  ]
 },
 "durationInQueue": {
  "integrationRuntimeQueue": 5
 }
}
For Each Activity
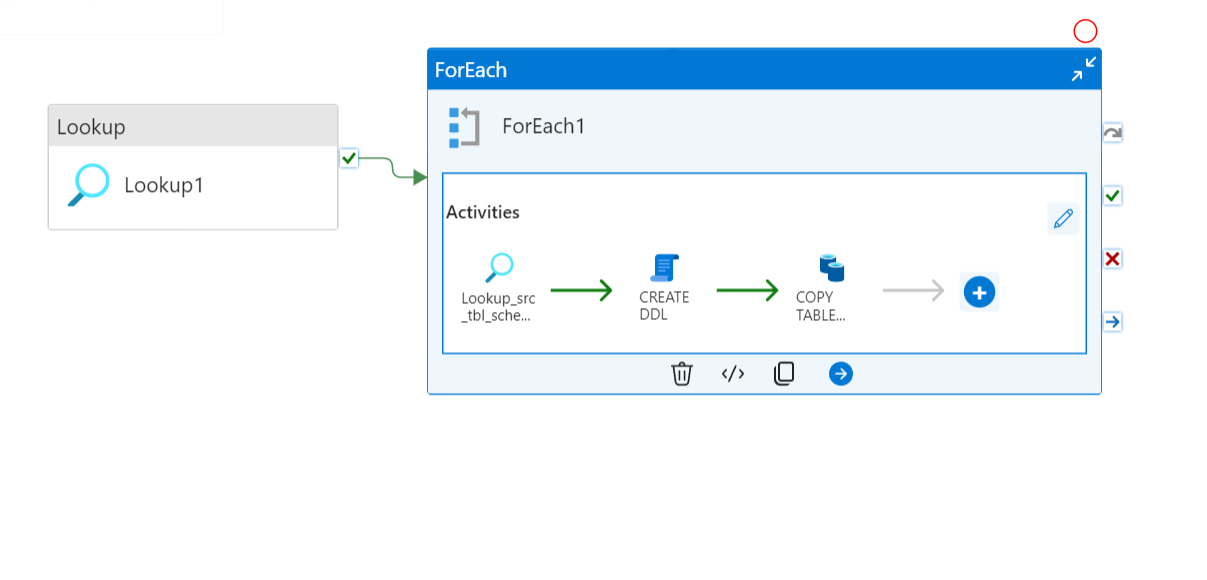
Next, we will use a For Each loop to iterate over the list of tables retrieved in the Lookup activity. We will configure the linked service for the source (On-Prem SQL Server) with the sink as Parquet on Azure Storage (ADLS Gen2 or Blob Storage).
Inside the loop, we will perform three activities:
Copy Activity (Copy data to Parquet)
Within the For Each activity, we will add a Copy activity that dynamically copies each table to a separate Parquet file in Blob Storage.
- The Lookup activity returns a list of tables with their corresponding schema and table names, which are stored as output variables
TABLE_SCHEMAandTABLE_NAME. - We use a For Each activity to loop through this list of tables.
- In the Copy activity, we specify the Source as the on-prem SQL server, and use the
Table_SchemaandTable_Nameparameters to dynamically select the table to copy. - We designate the sink as Blob Storage, and use the
TABLE_SCHEMAandTABLE_NAMEparameters to dynamically construct the file name and path for each table. The file name will be in the formatschema.table_name.parquet, and will be stored in a container in Blob Storage.
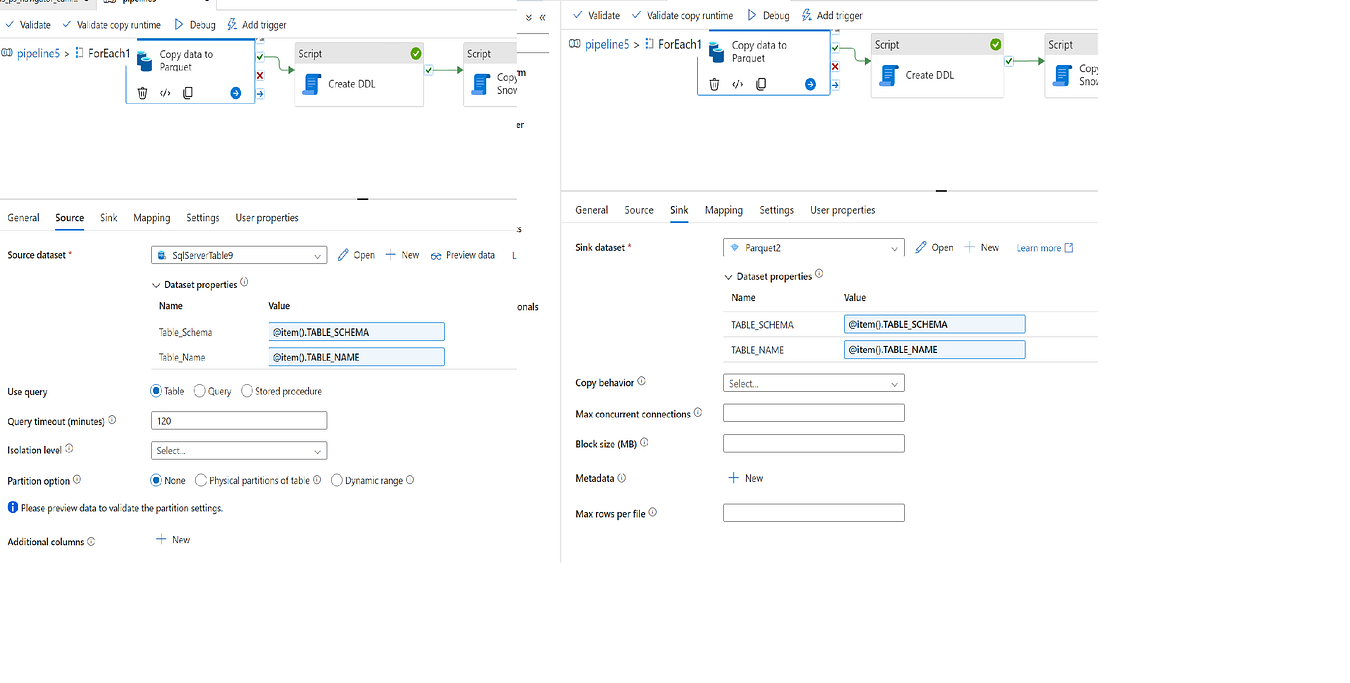
- We set the value of the
Table_SchemaandTable_Nameparameters to@item().TABLE_SCHEMAand@item().TABLE_NAME, respectively. This tells Azure Data Factory to take the schema and table names from the output of the Lookup activity and use them to populate theTable_SchemaandTable_Nameparameters. The same applies to the sink as well. - We then use these parameters to dynamically copy each table to a separate Parquet file in Blob Storage, with the file name and path constructed based on the schema and table name.
By using the output from the Lookup activity to populate our parameters, we can easily copy multiple tables to separate files without having to hardcode the schema and table names.
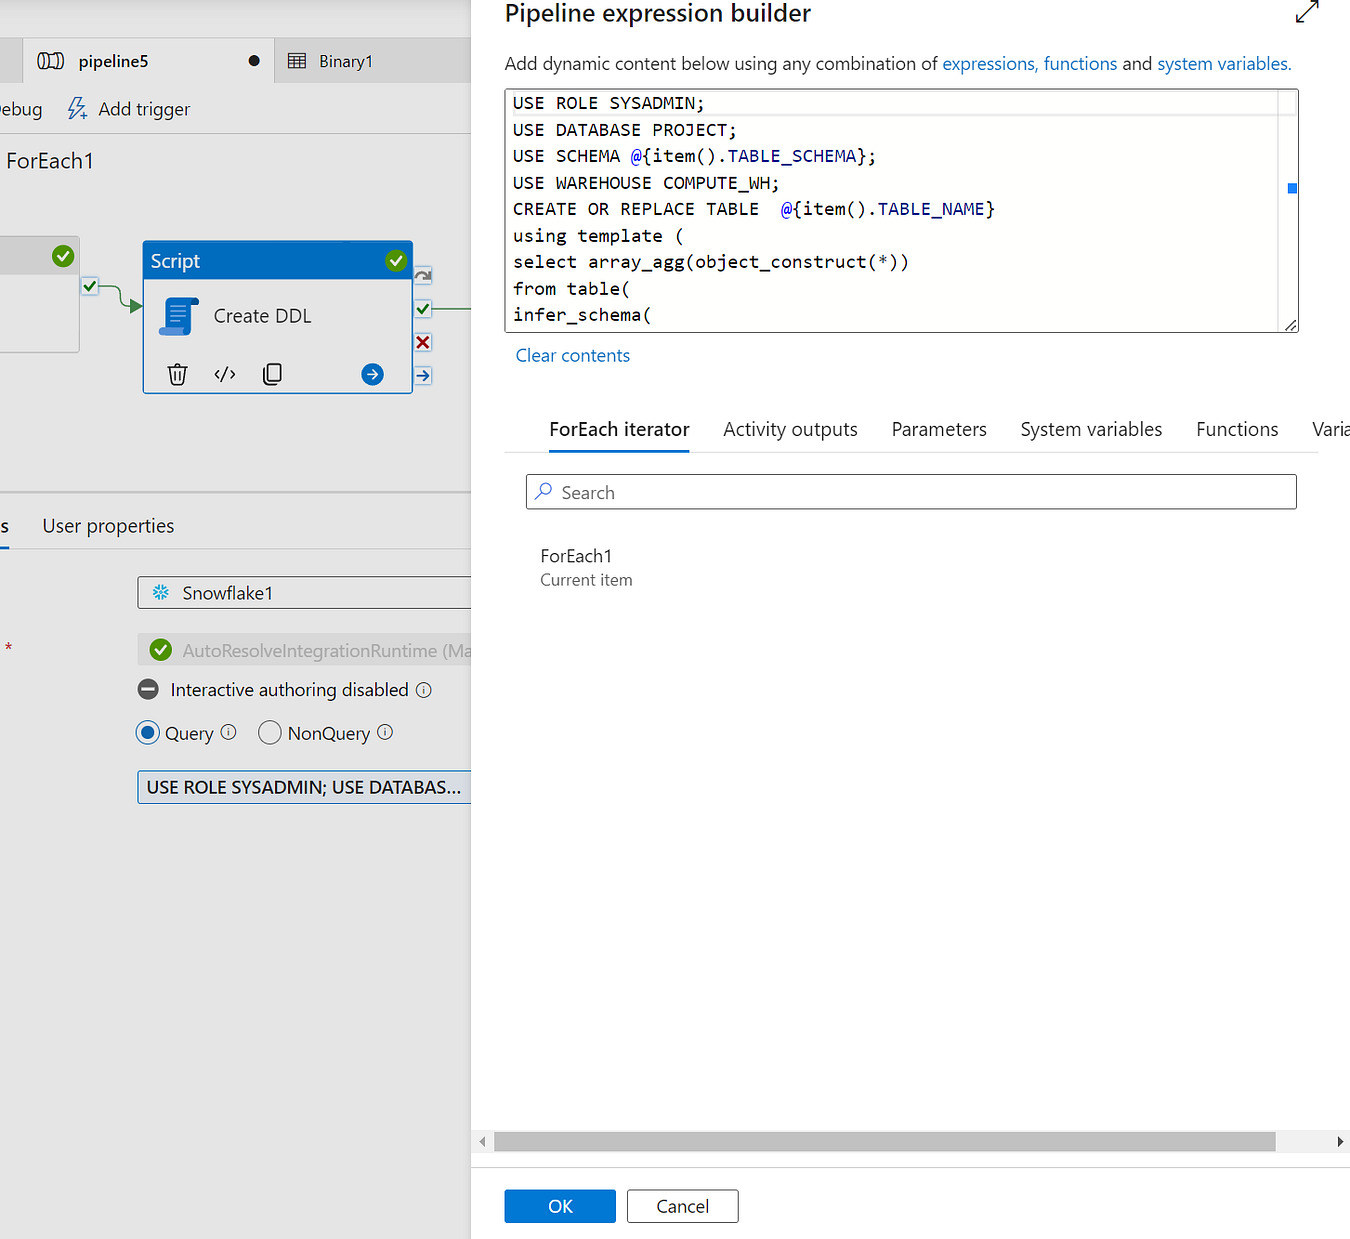
Script Activity (Create DDL)
After copying the data into Parquet files in Blob Storage, we use a Script activity to create the DDL and table in Snowflake.
Configure the link service to Snowflake in the data factory.
USE ROLE SYSADMIN;
USE DATABASE PROJECT;
USE SCHEMA @{item().TABLE_SCHEMA};
USE WAREHOUSE COMPUTE_WH;
CREATE OR REPLACE TABLE  @{item().TABLE_NAME}
using template (
select array_agg(object_construct(*))
from table(
infer_schema(
location=>'@projct/',
file_format=>'my_parquet_format',
FILES => ('@{item().TABLE_SCHEMA}.@{item().TABLE_NAME}.parquet')
)
)
);
The script uses the following commands:
- My role is Sysadmin and database is Project.
USE DATABASE PROJECT;sets the database context toPROJECT.USE SCHEMA @{item().TABLE_SCHEMA};sets the schema context to the schema of the current table being processed. The@{item().TABLE_SCHEMA}syntax refers to theTABLE_SCHEMAvalue from the output of the Lookup activity.CREATE OR REPLACE TABLE @{item().TABLE_NAME}...creates a new table in Snowflake with the same name as the current table being processed. TheOR REPLACEclause ensures that if the table already exists, it will be replaced.TABLE_NAMEvalue from the output of the Lookup activity.
The using template clause specifies the template for creating the table. In this case, it uses the Snowflake's infer_schema function to infer the schema of the Parquet file stored in Blob Storage.
The location=> ‘@projct/' parameter specifies the location of the Parquet file in the blob storage (I have already configured the storage integration between Snowflake and ADLS Blob storage with the external stage name ‘@projct’), and the file_format = 'my_parquet_format parameter specifies the file format. This format must be predefined in Snowflake. CREATE FILE FORMAT MY_PARQUET_FORMAT TYPE= PARQUET;
The FILES => ('@{item().TABLE_SCHEMA}.@{item().TABLE_NAME}.parquet') clause specifies the file name and path of the Parquet file to use. The file name is constructed dynamically using the schema and table name from the output of the Lookup activity.
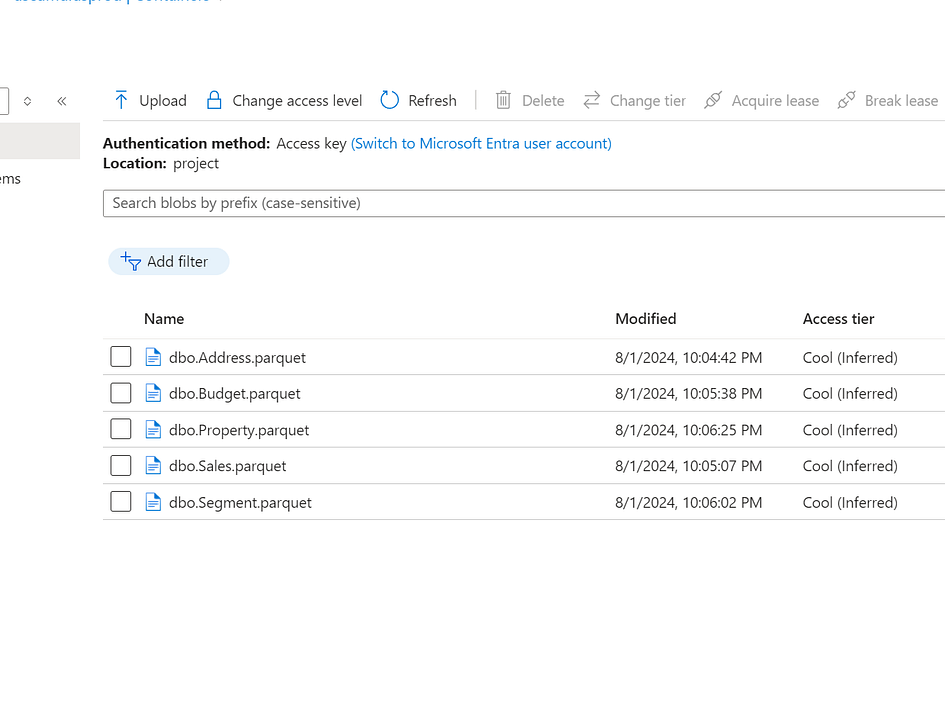
Five tables have been created in the Snowflake (please refer below)
Script Activity (Copy into Snowflake)
After creating the DDL for the table in Snowflake, we use the COPY INTO statement to transfer the data from the Parquet file in ADLS Blob storage into the table in Snowflake.
@concat('COPY INTO ',toUpper(item().TABLE_SCHEMA),'.',toUpper(item().TABLE_NAME),'
FROM @',toUpper(item().TABLE_SCHEMA),'.PROJCT/',item().TABLE_SCHEMA,'.',item().TABLE_NAME,'.parquet
FILE_FORMAT = ''',toUpper(item().TABLE_SCHEMA),'.MY_PARQUET_FORMAT''
MATCH_BY_COLUMN_NAME = CASE_INSENSITIVE;')
Here’s a breakdown of the COPY INTO statement:
COPY INTO: This is the command that tells Snowflake to copy data from an external source into a table.@concat: This is a function that concatenates strings together.toUpper(item().TABLE_SCHEMA): This gets the schema name from the output of the Lookup activity and converts it to uppercase.toUpper(item().TABLE_NAME): This gets the table name from the output of the Lookup activity and converts it to uppercase.FROM @,toUpper(item().TABLE_SCHEMA),'.PROJCT/',item().TABLE_SCHEMA,'.'.item().TABLE_NAME,'.PARQUET:This specifies the location of the parquet file in Blob storage.The@symbol refers to the external stage name@projct`.FILE_FORMAT ='', toUpper(item().TABLE_SCHEMA),'.MY_PARQUET_FORMAT'': This specifies the file format of the Parquet file.MATCH_BY_COLUMN_NAME = CASE_INSENSITIVE: This specifies that Snowflake should match the columns in the Parquet file to the columns in the table based on the column names, and that the matching should be case-insensitive.
Note that we use MATCH_BY_COLUMN_NAME = CASE_INSENSITIVE because the INFER_SCHEMA function does not return the columns in the same order as they appear in the file. By specifying MATCH_BY_COLUMN_NAME = CASE_INSENSITIVE, we ensure that Snowflake matches the columns correctly, regardless of their order in the file.
Now the data copied from On-prem SQL Server to Snowflake.
2) Custom SQL Query for DDL Generation
In this option, I utilized a combination of activities, including a Lookup activity, a For Each activity, and a Script activity, to generate the DDL scripts. Additionally, a Copy activity was used to transfer the data from the source database to Snowflake.
Lookup Activity
Replicating the same Lookup activity as mentioned in Option 1, I retrieved the schema information for 5 tables.
For Each Activity
In the ForEach activity, I utilized a combination of activities, including a Lookup activity, a Script activity, and a Copy activity.
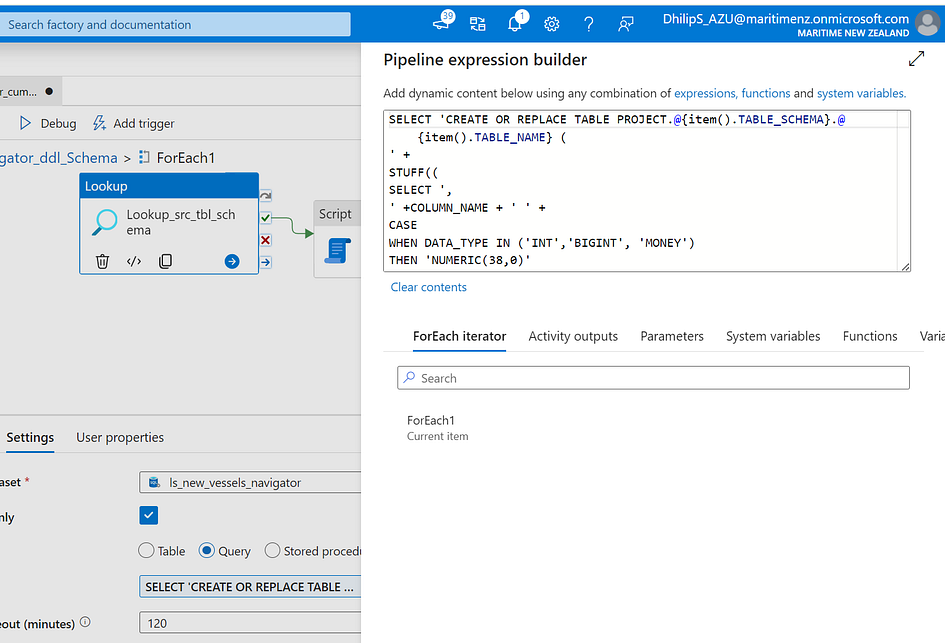
Lookup Activity
In this activity, I configured the linked service to connect to the on-premises SQL Server and used the following SQL query to generate the DDL script:
SELECT 'CREATE OR REPLACE TABLE PROJECT.@{item().TABLE_SCHEMA}.@{item().TABLE_NAME} (
' +
STUFF((
SELECT ',
' +COLUMN_NAME + ' ' +
CASE
WHEN DATA_TYPE IN ('INT','BIGINT', 'MONEY')
THEN 'NUMERIC(38,0)'
WHEN DATA_TYPE IN ('VARCHAR','NVARCHAR','CHAR','NCHAR','VARBINARY','UNIQUEIDENTIFIER')
THEN 'VARCHAR(' + CASE WHEN CHARACTER_MAXIMUM_LENGTH <= 0 THEN '8000' ELSE CAST(COALESCE(CHARACTER_MAXIMUM_LENGTH, 40) AS VARCHAR(10)) END + ')'
WHEN DATA_TYPE IN ('BIT')
THEN 'BOOLEAN'
WHEN DATA_TYPE IN ('DATETIME','DATETIME2')
THEN 'TIMESTAMP_NTZ'
WHEN DATA_TYPE IN ('DECIMAL','NUMERIC')
THEN 'NUMERIC(' + CAST(NUMERIC_PRECISION AS VARCHAR(10)) + ', ' + CAST(NUMERIC_SCALE AS VARCHAR(10)) + ')'
WHEN DATA_TYPE = 'TIMESTAMP'
THEN 'VARCHAR(20)'
ELSE DATA_TYPE
END
FROM INFORMATION_SCHEMA.COLUMNS
WHERE TABLE_NAME = '@{item().TABLE_NAME}'
AND TABLE_SCHEMA = '@{item().TABLE_SCHEMA}'
ORDER BY ORDINAL_POSITION
FOR XML PATH(''), TYPE).value('.', 'NVARCHAR(MAX)'), 1, 2, '') + ' );' AS CREATE_SCRIPT;
The outer SELECT statement constructs the beginning of the CREATE OR REPLACE TABLE statement. It dynamically inserts the schema and table name using the PROJECT.@{item().TABLE_SCHEMA}.@{item().TABLE_NAME} from the Lookup activity’s output, where PROJECT is the target database in Snowflake, and the placeholders are iterated over by the ForEach loop in Azure Data Factory, to generate the correct table creation statement for each table being processed.
The subquery SELECT + COLUMN NAME generates the list of columns and their corresponding data types for the CREATE TABLE statement.
It selects column names and their data types from INFORMATION_SCHEMA.COLUMNS for the specified table and schema.
The CASE statement maps SQL Server data types to their Snowflake equivalents:
→ INT, BIGINT, MONEY -> NUMERIC(38,0)
→ VARCHAR, NVARCHAR, CHAR, NCHAR, VARBINARY, UNIQUEIDENTIFIER -> VARCHAR with appropriate length.
→ BIT -> BOOLEAN
→ DATETIME, DATETIME2 -> TIMESTAMP_NTZ
→ DECIMAL, NUMERIC -> NUMERIC with precision and scale
→ TIMESTAMP -> VARCHAR(20)
The FOR XML PATH(''), TYPE).value('.', 'NVARCHAR(MAX)') part is used to concatenate the column definitions into a single string, separated by commas.ORDER BY ORDINAL_POSITION ensures that columns are listed in their original order in the table.
The STUFF function removes the leading comma and space from the concatenated column definitions.
The final string is appended with a closing parenthesis and semicolon to complete the CREATE TABLE statement. The final script is aliased asCREATE_SCRIPT.
Script Activity
In this activity, I execute the script generated in the previous step. The linked service is configured to connect to Snowflake.
@activity('Lookup_src_tbl_schema').output.firstrow.CREATE_SCRIPT
The above query retrieves the CREATE_SCRIPT from the previous Lookup activity and executes it in Snowflake, creating the table.
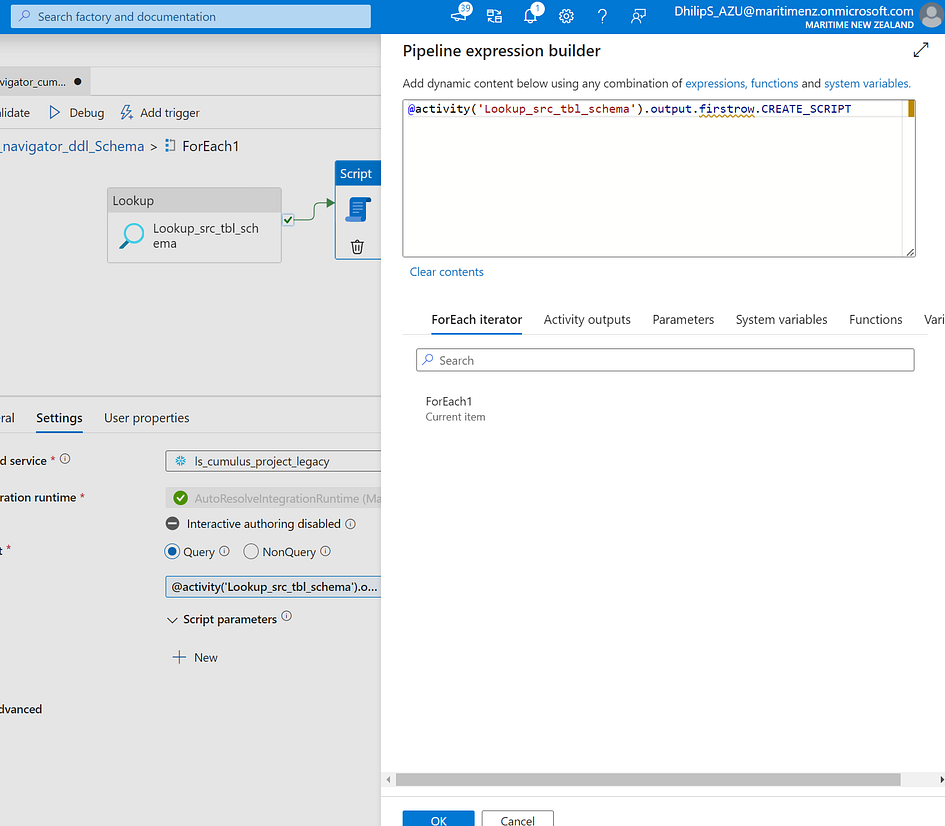
@activity('Lookup_src_tbl_schema'): Refers to the Lookup activity named 'Lookup_src_tbl_schema' that was executed earlier in the For Each loop..output: Accesses the output of that Lookup activity..firstrow: Selects the first row of the output, which contains the generated DDL script..CREATE_SCRIPT: The column in the first row that holds the DDL script.
Copy Activity (Copy to Snowflake)
Next, I copied the tables into Snowflake using the Copy Activity.
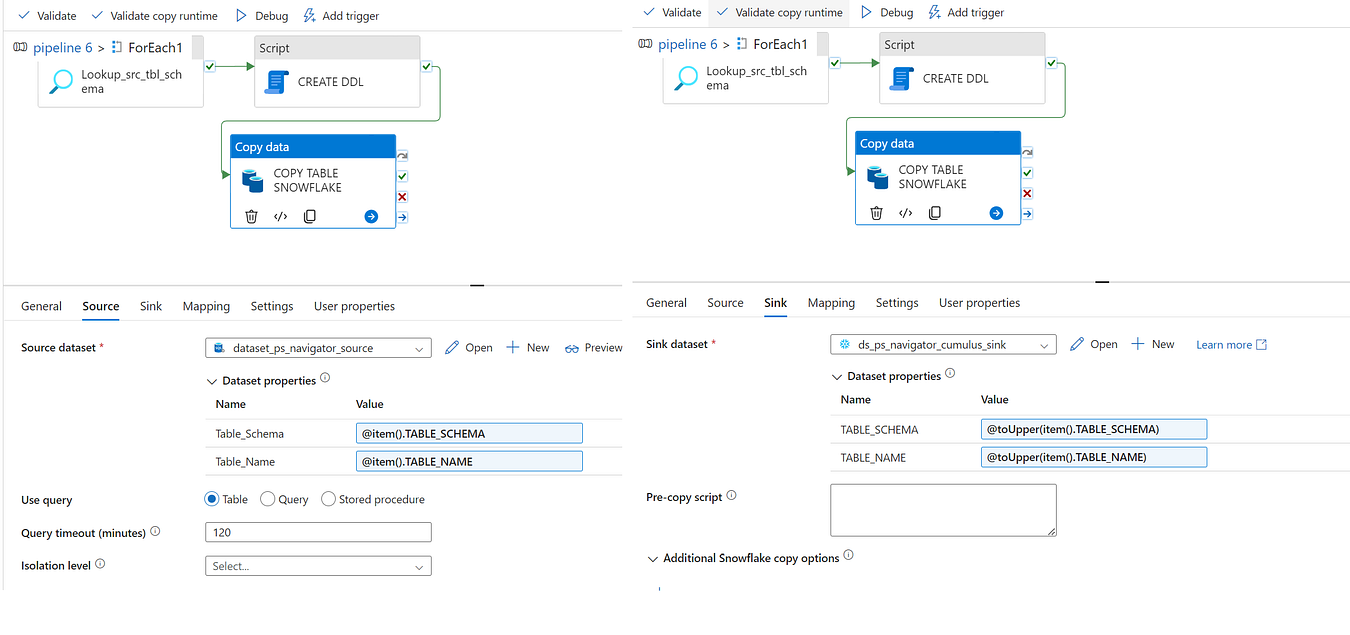
The first Lookup activity returned a list of tables with their corresponding schema and table names, which were stored as output variables TABLE_SCHEMA and TABLE_NAME.
I specified the source as the on-prem SQL server and created two parameters: TABLE_SCHEMA and TABLE_NAME. The values were @item().TABLE_SCHEMA and @item().TABLE_NAME, populated dynamically from the output of the Lookup activity.
The sink pointed to the Snowflake database. Again, I created two parameters: TABLE_SCHEMA and TABLE_NAME. The values were @toUpper(item().TABLE_SCHEMA) and @toUpper(item().TABLE_NAME), populated dynamically from the output of the Lookup activity.
Since SQL Server schema and table names might be in lowercase and Snowflake requires them in uppercase, I used the toUpper function to convert the names accordingly. This ensured that the names matched the expected format in Snowflake.
After configuring both the source and sink with the appropriate parameters, I transferred data from the on-premises SQL Server to Snowflake.
My source on-prem SQL Server is the 2013 version. I used a custom SQL query to create DDL and copy the tables into Snowflake, as it provides precise control over each column’s data type. Additionally, it allowed for custom mapping of SQL Server data types to Snowflake data types, accommodating differences between the two systems. Some columns have special cases, such as large text fields or unique data types, so I used a custom SQL script to create the DDL and move the data into Snowflake. I also used INFER_SCHEMA for a couple of databases.
Thank you for taking the time to read this. I’d love to hear your thoughts and insights, so don’t hesitate to leave a comment. If you have anything to add, please feel free to comment!
Feel free to connect with me on LinkedIn!