Extract, Transform, and Enhance: Using Snowflake and Azure OpenAI for PDF Data


I’ve primarily focused on building data pipelines, creating data models, and developing Power BI dashboards. One of my recent projects involved extracting data from PDF files, loading it into Snowflake, and using OpenAI to rewrite specific columns, with the final results saved into new columns. While this approach isn’t entirely new, it was my first time integrating OpenAI into my work, and I’m excited to share my experience and insights through this blog.
Use Case
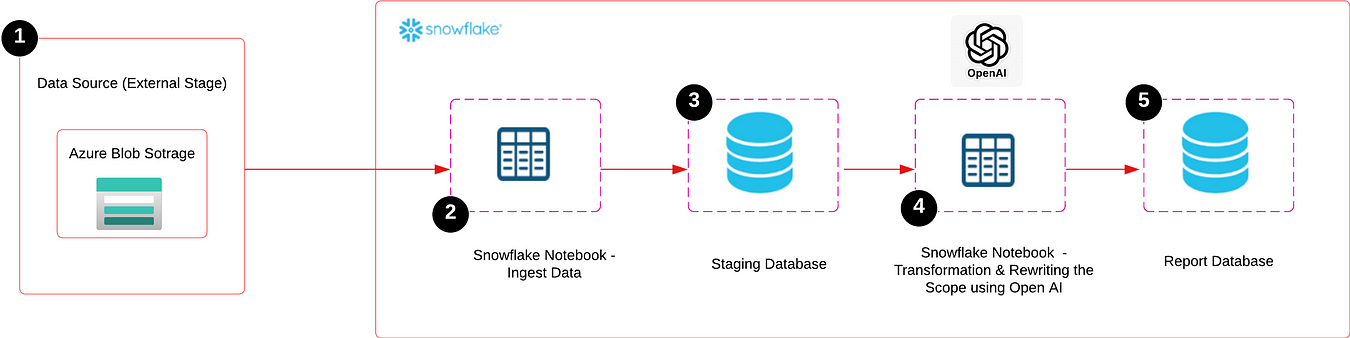
Received approximately 2,500 PDF files in blob storage, containing various project details related to tenders across different segments. The goal is to extract key fields from these PDF files and load the data into a Snowflake table within the Staging database. After cleaning the data, the project scope for each entry will be rewritten in a simpler form using Azure Open AI, and this simplified scope will be saved as a new column in a Snowflake table within the Reporting database. This reporting table will then be connected to Power BI to build a dashboard that enables the sales team to take actionable steps for bidding on or approaching clients for each project.
Getting Started
- I created an external stage called ‘PROJCT’ in Snowflake, which points to my Azure Blob storage where I loaded my PDF files. You can refer to the documentation on how to create an external stage.
- I used Snowflake Notebook for this project, utilizing both Python and SQL.
- Azure Open AI, requests, and PyPDF2 libraries have been added in the package options in the Snowflake Notebook.
- You’ll need to configure External Access Integration to connect to Azure Open AI (the steps are explained later in this blog).
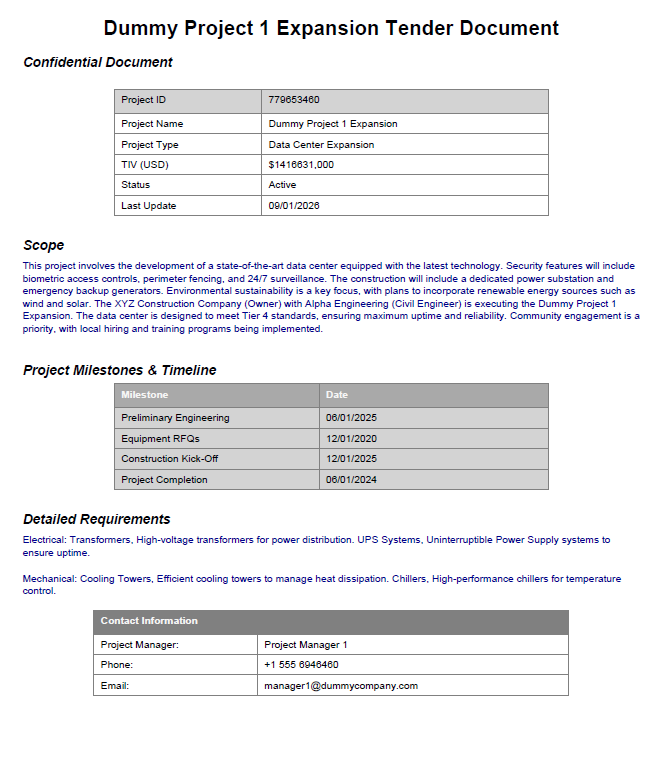
PDF File
In my original use case, the PDF files were complex, and I used the PDFMiner library to extract the data. However, for this blog, I created some dummy PDFs, as shown below, and extracted fields like Project ID, Project Name, Project Type, TIV (USD), Status, Last Update, Scope, etc using PyPDF2 library.
Extracting and Reading PDF Files from Blob Storage
The first step is to read all the PDF files stored in the blob storage. I’ve already created an external stage in Snowflake called ‘PROJCT’ to manage these files. I’m using Python, executed within the Snowflake notebook, to read and extract the content from the PDFs. We need to add PyPDF2 package by clicking the "Packages" button in the top right corner of the Snowflake notebook.
# Import necessary libraries
import pandas as pd
import PyPDF2
import re
import os
from snowflake.snowpark.context import get_active_session

# Function to list all PDF files in the specified Snowflake stage
def list_pdf_files(stage_name):
    # Get the current active session in Snowflake
    session = get_active_session()

    # Execute SQL command to list files in the stage and collect results
    result = session.sql(f"LIST @{stage_name}").collect()

    # Extract file names from the result that end with '.pdf'
    pdf_files = [row['name'] for row in result if row['name'].endswith('.pdf')]

    return pdf_files

# Function to download a PDF file from the Snowflake stage to a local directory
def download_pdf_file(stage_name, file_name):
    # Get the current active session in Snowflake
    session = get_active_session()

    # Extract the base file name (removing any directory path)
    file_name_only = os.path.basename(file_name)

    # Define the local path to save the PDF file (in the '/tmp' directory)
    local_file_path = os.path.join('/tmp', file_name_only)

     # Get a stream of the file from the Snowflake stage
    file_stream = session.file.get_stream(f'@{stage_name}/{file_name_only}')

    # Write the content of the file stream to the local file
    with open(local_file_path, 'wb') as f:
        f.write(file_stream.read())

    return local_file_path

# Function to extract text content from a PDF file
def extract_text_from_pdf(local_file_path):

    with open(local_file_path, 'rb') as file:
        # Create a PDF reader object
        pdf_reader = PyPDF2.PdfReader(file)

        # Initialize an empty string to hold the extracted text
        pdf_text = ""

        # Loop through each page of the PDF and extract text
        for page in pdf_reader.pages:
            pdf_text += page.extract_text()

    return pdf_text

# Function to extract specific data from the PDF text using regular expressions
def extract_data_from_text(pdf_text):

    patterns_corrected = {
        "Project ID": r"Project ID\s*(\d+)",
        "Project Name": r"Project Name\s*([^\n]+)",
        "Project Type": r"Project Type\s*([^\n]+)",
        "TIV (USD)": r"TIV \(USD\)\s*\$([\d,]+)",
        "Status": r"Status\s*([^\n]+)",
        "Last Update": r"Last Update\s*(\d{2}/\d{2}/\d{4})",
        "Scope": r"Scope\s*(.+?)(?=\nProject Milestones & Timeline)",
        "Preliminary Engineering": r"Preliminary Engineering\s*(\d{2}/\d{2}/\d{4})",
        "Equipment RFQs": r"Equipment RFQs\s*(\d{2}/\d{2}/\d{4})",
        "Construction Kick-Off": r"Construction Kick-Off\s*(\d{2}/\d{2}/\d{4})",
        "Project Completion": r"Project Completion\s*(\d{2}/\d{2}/\d{4})",
        "Electrical": r"Electrical:\s*(.+?)(?=\nMechanical:)",
        "Mechanical": r"Mechanical:\s*(.+?)(?=\nContact Information)",
        "Project Manager": r"Project Manager:\s*(.+?)(?=\nPhone:)",
        "Phone": r"Phone:\s*(\+\d{1,3}\s\d{3}\s\d{7})",
        "Email": r"Email:\s*(\S+@\S+)"
    }

    # Initialize a dictionary to store the extracted data
    extracted_data = {}

    # Loop through the patterns and search the PDF text for matches
    for key, pattern in patterns_corrected.items():
        match = re.search(pattern, pdf_text, re.DOTALL)
        if match:
            extracted_data[key] = match.group(1).strip()
        else:
            extracted_data[key] = None

    return extracted_data

# Main function to process all PDF files in the specified Snowflake stage
def process_all_pdfs(stage_name):
    # List all PDF files in the Snowflake stage
    pdf_files = list_pdf_files(stage_name)

    # Initialize an empty DataFrame to store the extracted data
    df = pd.DataFrame()

    # Loop through each PDF file
    for file_name in pdf_files:
        try:
            # Download the PDF file locally
            local_file_path = download_pdf_file(stage_name, file_name)

            # Extract text content from the downloaded PDF
            pdf_text = extract_text_from_pdf(local_file_path)

            # Extract specific data from the PDF text
            extracted_data = extract_data_from_text(pdf_text)

            # Convert the extracted data into a DataFrame
            df_corrected = pd.DataFrame([extracted_data])

            # Append the data to the main DataFrame
            df = pd.concat([df, df_corrected], ignore_index=True)
        except Exception as e:
            # Print an error message if processing fails for any file
            print(f"Error processing file {file_name}: {str(e)}")

    return df

# Execute the main function with the stage name 'PROJCT'
stage_name = "PROJCT"
df = process_all_pdfs(stage_name)
- Step 1: The code starts by importing all the necessary libraries that will be used for extracting data from PDFs, handling files, and interacting with Snowflake.
- Step 2: The
list_pdf_filesfunction lists all PDF files stored in the specified Snowflake stage, filtering only those with a.pdfextension. - Step 3: The
download_pdf_filefunction downloads a specific PDF file from the Snowflake stage to a local temporary directory for processing. - Step 4: The
extract_text_from_pdffunction reads the downloaded PDF file and extracts all the textual content from it. - Step 5: The
extract_data_from_textfunction uses regular expressions to search for and extract specific pieces of information (like Project ID, Scope, etc.) from the extracted PDF text. - Step 6: The
process_all_pdfsfunction orchestrates the entire process, handling multiple PDFs. It extracts the relevant data from each PDF and compiles it into a pandas DataFrame. - Step 7: The final part of the code executes the
process_all_pdfsfunction, passing the Snowflake stage (PROJCT) name as an argument, and stores the resulting DataFrame indf.
Output

Loading a Dataframe (df) into a Snowflake Table
Now we’re going to load a dataframe(df) directly into a Snowflake table. I'm creating a table called 'PDFEXTRACT' under the 'DBO' schema within the 'STAGING' database. I have already integrated the 'STAGING' database in my Snowflake notebook, so I'm not explicitly mentioning the 'STAGING' database in my code.
def load_dataframe_directly_to_snowflake(df, table_name='PDFEXTRACT', schema_name='DBO'):
    session = get_active_session()

    # Create the table if it doesn't exist
    session.sql(f"""
        CREATE TABLE IF NOT EXISTS {schema_name}.{table_name} (
            "Project ID" STRING,
            "Project Name" STRING,
            "Project Type" STRING,
            "TIV (USD)" STRING,
            "Status" STRING,
            "Last Update" STRING,
            "Scope" STRING,
            "Preliminary Engineering" STRING,
            "Equipment RFQs" STRING,
            "Construction Kick-Off" STRING,
            "Project Completion" STRING,
            "Electrical" STRING,
            "Mechanical" STRING,
            "Project Manager" STRING,
            "Phone" STRING,
            "Email" STRING
        )
    """).collect()

    # Load the DataFrame into the Snowflake table with auto_create_table=True
    session.write_pandas(df, table_name, schema=schema_name, auto_create_table=True)

    print(f"Data successfully loaded into {schema_name}.{table_name}")

# Execute the function to load the DataFrame into the PDFextract table
load_dataframe_directly_to_snowflake(df)
load_dataframe_directly_to_snowflake(df, table_name='PDFEXTRACT', schema_name='DBO'): This function takes three parameters:df (dataframe),table_name, schema_name . My table name here is PDFEXTARCT and Schema name is DBO
The function first checks if the table exists in the specified schema. If it doesn’t, it creates the table with the necessary columns and data types. The SQL CREATE TABLE IF NOT EXISTS statement is used for this purpose.
The session.write_pandas() method is used to load the DataFrame into the specified Snowflake table. The auto_create_table=True argument ensures that if the table doesn't exist, it will be created automatically based on the DataFrame's structure.
After successfully loading the data, a confirmation message is printed to indicate that the data has been loaded into the specified table.
Finally, the function load_dataframe_directly_to_snowflake(df) is called to load the DataFrame df into the PDFEXTRACT table in the DBO schema.
The table ‘PDFEXTRACT’ was created under the ‘PROJECT’ database and the ‘DBO’ schema.
Output

Transforming and Rewriting the Project Scope using Open AI
The raw data is now loaded into the staging database in a table called ‘PDFEXTRACT’. In my original PDFs, there were many fields that required cleaning and transformation, so I used a separate notebook to handle this process, including rewriting the project scope. Although the PDF in this example doesn’t require much cleaning, I still used a separate notebook for consistency and integrated it with the REPORT database.
import pandas as pd
import PyPDF2
import re
import os
from snowflake.snowpark.context import get_active_session
session = get_active_session()
# Query the data from the PDFEXTRACT table in the silver database
query = "SELECT * FROM DBO.PDFEXTRACT"

# Execute the query and save the result as a DataFrame
df = session.sql(query).to_pandas()

# Convert 'Project ID' to a numeric type (integer)
df['Project ID'] = pd.to_numeric(df['Project ID'], errors='coerce')

# Convert 'TIV (USD)' to a numeric type (float, removing commas)
df['TIV (USD)'] = df['TIV (USD)'].replace({',': ''}, regex=True).astype(float)

# Convert date columns to datetime type
date_columns = [
    "Last Update",
    "Preliminary Engineering",
    "Equipment RFQs",
    "Construction Kick-Off",
    "Project Completion"
]

for col in date_columns:
    df[col] = pd.to_datetime(df[col], errors='coerce').dt.strftime('%Y-%m-%d')
First, I connect to the active Snowflake session using get_active_session(). Then, I execute a SQL query to select all the data from the PDFEXTRACT table within the DBO schema. The query results are loaded into a pandas DataFrame (df).
Next, I perform a data type conversions to ensure the data is in the correct format:
- The ‘Project ID’ column is converted to an integer type using
pd.to_numeric(). Any non-numeric values are coerced intoNaN. - The ‘TIV (USD)’ column, which contains large numbers formatted with commas, is first cleaned by removing the commas and then converted to a float type.
- I then convert several columns containing dates (‘Last Update’, ‘Preliminary Engineering’, ‘Equipment RFQs’, ‘Construction Kick-Off’, and ‘Project Completion’) to a consistent
YYYY-MM-DDdatetime format usingpd.to_datetime().
After transforming the data, I loaded the DataFrame into a new table called ‘REPORT’ under the ‘REPORT’ database and the ‘DBO’ schema. I used the same user-defined function (load_dataframe_directly_to_snowflake) that we created in the staging notebook, ensuring that the table has the correct data types.
def load_dataframe_directly_to_snowflake(df, table_name='REPORT', schema_name='DBO'):
    session = get_active_session()

    # Create the table if it doesn't exist
    session.sql(f"""
        CREATE TABLE IF NOT EXISTS {schema_name}.{table_name} (
            "Project ID" NUMBER,
            "Project Name" STRING,
            "Project Type" STRING,
            "TIV (USD)" FLOAT,
            "Status" STRING,
            "Last Update" DATE,
            "Scope" STRING,
            "Preliminary Engineering" DATE,
            "Equipment RFQs" DATE,
            "Construction Kick-Off" DATE,
            "Project Completion" DATE,
            "Electrical" STRING,
            "Mechanical" STRING,
            "Project Manager" STRING,
            "Phone" STRING,
            "Email" STRING
        )
    """).collect()

    # Load the DataFrame into the Snowflake table with auto_create_table=True
    session.write_pandas(df, table_name, schema=schema_name, auto_create_table=True)

    print(f"Data successfully loaded into {schema_name}.{table_name}")

# Execute the function to load the DataFrame into the PDFextract table
load_dataframe_directly_to_snowflake(df)
Output

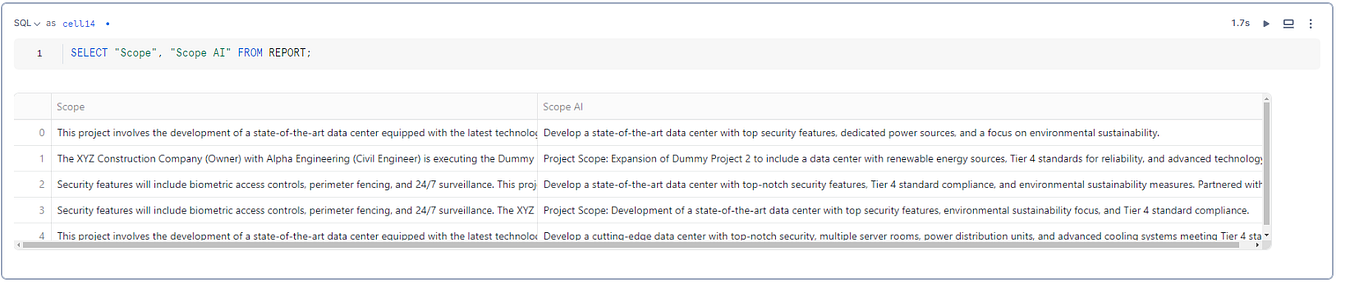
Now that the data is cleaned and transformed, the next step is to rewrite the ‘Scope’ column using OpenAI and save it as a new column called ‘Scope AI’. To do this, we need to securely connect to the OpenAI API from within the Snowflake notebook.
We’ll use External Access Integration, which allows us to securely reach public internet endpoints, like the OpenAI API, directly from Snowflake. This approach ensures that we can connect to OpenAI without needing any additional infrastructure setup, making the process smooth and secure.
CREATE OR REPLACE NETWORK RULE OPENAI_NETWORK_RULE
 MODE = EGRESS
 TYPE = HOST_PORT
 VALUE_LIST = ('api.openai.com');
This code creates a network rule in Snowflake called OPENAI_NETWORK_RULE. The rule allows Snowflake to make outbound connections to the Open AI API at api.openai.com. This is necessary to enable Snowflake to communicate with Open AI and send requests to its API.
 CREATE OR REPLACE SECRET OPENAI_API_KEY
    TYPE = GENERIC_STRING
    SECRET_STRING='XXXXXX';
The above code creates or replaces a secret in Snowflake named OPENAI_API_KEY. The secret stores your OpenAI API key, which is required to authenticate and make requests to the OpenAI API. To use this, you must first subscribe to an OpenAI API key from OpenAI. This key is then securely stored in Snowflake, allowing you to use it in your code without exposing it directly.
 CREATE OR REPLACE EXTERNAL ACCESS INTEGRATION OPENAI_INTEGRATION
    ALLOWED_NETWORK_RULES = (OPENAI_NETWORK_RULE)
    ALLOWED_AUTHENTICATION_SECRETS = (OPENAI_API_KEY)
    ENABLED=TRUE;
This code creates or replaces an external access integration in Snowflake called OPENAI_INTEGRATION. It allows Snowflake to securely connect to external services using the specified network rule (OPENAI_NETWORK_RULE) and the stored API key (OPENAI_API_KEY). Setting ENABLED=TRUE activates this integration, making it ready to use.
CREATE OR REPLACE FUNCTION OPENAI_REWRITE_SCOPE(scope_text STRING)
RETURNS STRING
LANGUAGE PYTHON
RUNTIME_VERSION = 3.8
HANDLER = 'ask_OpenAI'
EXTERNAL_ACCESS_INTEGRATIONS = (OPENAI_INTEGRATION)
PACKAGES = ('requests')
SECRETS = ('cred' = OPENAI_API_KEY)
AS
$$
import requests
import json
import _snowflake

def ask_OpenAI(scope_text):
 api_key = _snowflake.get_generic_secret_string("cred")

 url = "https://api.openai.com/v1/chat/completions"

 headers = {
 "Authorization": f"Bearer {api_key}",
 "Content-Type": "application/json"
 }

 data = {
 "model": "gpt-3.5-turbo",
 "messages": [
 {"role": "system", "content": "You are a project manager who wants to simplify project scopes for the sales team so they can take action on bidding."},
 {"role": "user", "content": f"Simplify the following project scope. Only provide the simplified scope, without any introductions or explanations:\n\n{scope_text}"}
 ],
 "max_tokens": 150,
 "temperature": 0.7
 }

 response = requests.post(url, headers=headers, data=json.dumps(data))

 if response.status_code == 200:
 return response.json()['choices'][0]['message']['content'].strip()
 else:
 return f"Error: {response.status_code} - {response.text}"
$$;
The above code defines a User-Defined Function (UDF) in Snowflake called OPENAI_REWRITE_SCOPE. The function takes a piece of text (specifically a project scope) as input and returns a simplified version of that text using OpenAI's API.
- Name: The function is named
OPENAI_REWRITE_SCOPE. - Input: It takes one input parameter
scope_textof typeSTRING. - Output: It returns a
STRINGwhich is the simplified scope. - Language: The function is written in Python, using version 3.8.
- Handler: The Python function
ask_OpenAIis specified as the handler, meaning this is the code that will be executed when the function is called. - External Access: The function uses
OPENAI_INTEGRATIONto securely connect to the OpenAI API (created in the previous steps). Before executing the function, you need to activate this external access in the Snowflake notebook settings. - Packages: The
requestspackage is used to make HTTP requests to the Open AI API. - Secrets: The API key is securely accessed via the
OPENAI_API_KEYstored in Snowflake. - The function retrieves the OpenAI API key securely using
_snowflake.get_generic_secret_string("cred"). - URL: The request is sent to the OpenAI API endpoint for chat completions.
- Headers: The headers include the API key for authentication.
- Data: The request data specifies the model (
gpt-3.5-turbo) and includes a prompt asking OpenAI to simplify the project scope. Themax_tokensandtemperaturecontrol the length and creativity of the response. (Change the prompt based on the requirement) - Request: The function sends a POST request to the Open AI API.
- Response Handling: If the API call is successful (status code 200), the function returns the simplified scope text. If the request fails, it returns an error message with the status code and error details.
ALTER TABLE PROJECT.DBO.PDFEXTRACT
ADD COLUMN "Scope AI" STRING;
The above SQL statement adds a new column named Scope AI to the existing REPORT table in the REPORT database under the DBO schema.
UPDATE PROJECT.DBO.PDFEXTRACT
SET "Scope AI" = OPENAI_REWRITE_SCOPE("Scope");- The above SQL statement populates the newly added
Scope AIcolumn. - The
UPDATEstatement sets the value ofScope AIfor each row in thePDFEXTRACTtable by calling theOPENAI_REWRITE_SCOPEfunction. - The function
OPENAI_REWRITE_SCOPE("Scope")takes the existingScopecolumn as input, simplifies the text using Open AI, and returns the simplified version. This result is then stored in theScope AIcolumn.
Output
Thank you for taking the time to read this. I’d love to hear your thoughts and insights, so don’t hesitate to leave a comment. If you have anything to add, please feel free to comment!
Feel free to connect with me on LinkedIn!